

Graphics rendering stack
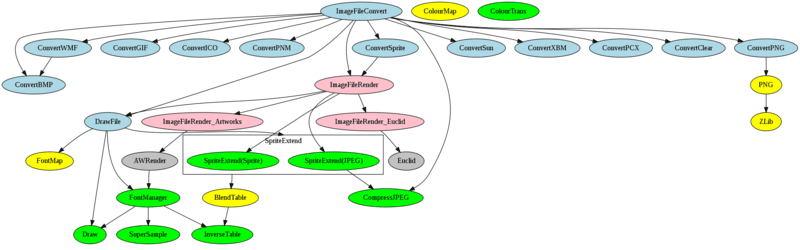
The graphics rendering stack - known more generally as the 'Image File stack' - is pretty spread out, and relies on a lot of components, some of which I've already spoken about. It didn't start out that way - I'll talk a little more about how it developed in a little bit - but let's look at how it is structured right now. I'll ignore the actual rendering to the screen, as that itself is a bit of fun that complicates things. The following diagram focuses on the ImageFileConvert stack, but it should give you an idea of how the graphics system is structured.
(Larger version (69K))
- Blue highlights the ImageFileConvert modules.
- Red highlights the ImageFileRender modules.
- Yellow highlights the Select specific modules (mine).
- Grey highlights third party modules.
- Green highlights existing RISC OS modules.
The ColourTrans module is left out of the connections because it is used by most of the rendering modules, and many of the conversion modules. The ColourMap module is similarly left out of the connections, as the maps it produces are used by other components but it is not really called by any of them.
Anyhow, having looked at what it is, let's go back to the early components...
PNG
The PNG format had a very good history with RISC OS, with !Browse being one of the first browsers to fully support them, including full alpha transparency in its first release. There was reasonable support in the form of conversion tools - John Kortink's !Creator and !Translator supported the format, and a selection of less comprehensive but very good tools such as Darren Salt's !SprToPNG (not to belittle anyone else's work - these were the ones that immediately spring to mind). Kevin Bracey ported !Zip2000, adding support to it for alpha-channel PNGs.
However, the Operating System itself had no support either as a first-class or second-class feature. The PNG module was an attempt to begin its introduction as a second-class feature. The module itself was a port of libpng with a number of SWIs to handle different types of operations on the PNGs themselves, exporting the APIs that the library provided.
The module used the ZLib module, so the two had to be supplied together, but as both were in the ROM, that wasn't a problem. The API for ZLib was stable, and the interface library was resilient in the face of the module being reinitialised under it - state was expected to be the same but should be detected and failed gracefully if it was not. The PNG module provided just 15 SWIs for the entire API. Because there were so many functions exported by the library, it wasn't possible to allocate them to SWIs on a 1:1 basis, so I grouped them by their functional area.
This made a lot of the operations clearer in principle, but obscure in specifics - if you were using the SWI interface. The PNG module created its own exported library which matched the functionality of the PNG library itself, but which would call the relevant module calls. In some cases this meant a little bit of juggling as the external API called for large numbers of parameters or floating point parameters to be passed.
In the case of floating point parameters, these were actually scaled to fixed point numbers prior to the SWI call, and then converted back to floating point numbers inside the module. This was less than ideal, but the number of cases where the floating point numbers are needed was pretty small. It also retained the principles that SWI calls only passed integer values in the regular processor registers. I certainly didn't feel that redefining the SWI calling conventions at that point would have any benefit.
The entire API translation was defined in a 'simple' description file which defined the constants, the SWIs, their function mappings and a selection of data values. This was processed by a Perl translator which would create:- C header file for exported library.
- Assembler source for exported library (which calls the SWIs in the manner expected by the original libpng).
- C source to process the SWI call into a dispatch to the correct PNG function and return data in the right registers.
- Assembler definitions of the SWI numbers and constants.
- BASIC library defining the SWI numbers and constants.
The exported functions were set up in such a way that any errors that
returned would be passed either to the handler function, or through
the failure longjmp buffer which had been set up previously.
There were a lot of contortions to go through to get it working
correctly, but it was both fun and very useful - anything could be
relinked to use the shared library (near enough).
The BASIC export was really just so that I could create a !ChangeFSI which supported the import of PNGs. It wasn't a huge change, and wasn't entirely flexible, but it at least made use of the calls and allowed us to handle PNGs, albeit in a simple way.
The 'get chromaticity' function call was never exported through the interface exported by the module because the number of parameters it took wasn't possible to handle with the SWI interface translation that I'd used. I had intended to modify the interface for just that call so that the relevant parameters were passed in a data structure in memory, rather than direct registers. However, as there was little use (in anything that was using the API) for the function, it was not a priority.
Whereas (I believe) every other module got at least a reasonable amount of documentation, the sheer number of interfaces and the manner in which they differed from the documented libpng interfaces when called as SWIs (which wasn't much but did make it more tedious), meant that I never got around to doing so.
The initial release of the PNG developers kit had a reasonable amount of effort put into making what I thought would be a useful kit that would make it easier for people to use the PNG module.
When I first wrote this ramble I had lamented the poorness of the documentation for the PNG module. I believed that it was only sketchily documented. However, I had a quick look through the PNG developers kit, and the entire module interface is completely documented - in a 48K text file, which is more than most components have. There's example code in BASIC, and in C for communicating directly with the PNG module.
There was no feedback for the PNG developers kit once it was released, except from those who had worked with it under alpha. As a result, it never progressed any further, and PNG work was put on hold for a little while. In some respects, more time could have gone in to documenting it better - should have, given that every interface should be properly documented as it's written. On the other hand, the lack of external interest showed that such work probably wouldn't have been worthwhile use of time. So maybe it's for the best that the time was not spent on documentation.
It's always a bit of a balancing act to get sufficient features implemented, but also documented in a useful way. Whilst you could argue that the PNG module was always intended as a stepping stone towards becoming a first-class feature, even the second-class feature that it was ought to be documented properly to ensure that it is usable, both internally and externally.
REM >TestCreate
REM A Very Simple Sprite to PNG converter
REM This example creates a PNG using the memory buffering routines
REM from a sprite. The classes of sprite which are accepted are
REM limited (for example, it must contain a palette if it is a
REM shallow sprite).
REM The sprite file (file$) is loaded, processed and then saved as
REM 'PNG'.
:
LIBRARY "BasicPNG":PROCpnglib_init
:
ON ERROR REPORT:PRINT" at line ";ERL:END
:
REM Load the sprite
file$="sprite"
SYS "OS_File",5,file$ TO ,,,,sprlen%
DIM spr% sprlen%+4
!spr%=sprlen%+4
SYS "OS_File",255,file$,spr%+4,0
:
mode%=spr%!&38
linelen=(spr%!&20+1)*4
height=spr%!&24+1
SYS "OS_ReadModeVariable",mode%,9 TO ,,log2bpp
IF log2bpp<>5 THEN
 width=linelen*8/(1<<log2bpp)
ELSE
 width=linelen/4
ENDIF
width-=(31-spr%!&2c)/(1<<log2bpp)
PRINT"Width: ";width
PRINT"Line length: ";linelen
:
screen%=spr%+spr%!&34+16
palette%=spr%+&3c
IF palette%=screen% AND log2bpp<=3 THENERROR 1,"No palette in sprite (poor test code)"
IF log2bpp=4 THENERROR 1,"I don't like 16bpp sprites. Sorry"
:
REM Now change the palette to a format that pnglib can use
IF log2bpp<=3 THEN
 DIM newpalette% 256*4
 SYS "ColourTrans_ReadPalette",spr%,spr%+16,newpalette%,256*4,%01
ENDIF
:
:
REM Create PNG structure
version$="1.0.5"
PRINT"Creating structure : ";version$
SYS "PNG_Structure",PNG_Structure_create_write_struct,version$,0,0,0 TO struct%
PRINT"Created as ";~struct%
:
REM Make info
PRINT"Creating info structure"
SYS "PNG_Info",PNG_Info_create_info_struct,struct% TO info%
PRINT"Created as ";~info%
:
REM Set up a simple error handler
ON ERROR PROCerror(ERR,REPORT$,ERL):END
:
REM Using an output file
o%=OPENOUT("PNG")
SYS "PNG_Functions",PNG_Functions_init_io,struct%,o%
:
REM Set compression level
PRINT"Setting compression level"
SYS "PNG_Compression",PNG_Compression_set_compression_level,struct%,Z_BEST_COMPRESSION
:
REM Set up our parameters
interlace=PNG_INTERLACE_NONE
REM interlace=PNG_INTERLACE_ADAM7
:
REM Set up the chunk info
depth=1<<log2bpp
IF depth>8 THENdepth=8
IF log2bpp<=3 THEN
 colour_type=PNG_COLOR_TYPE_PALETTE
ELSE
 colour_type=PNG_COLOR_TYPE_RGB
ENDIF
PRINT"Depth = ";depth
PRINT"ColourType = ";colour_type
SYS "PNG_SetChunkInfo",PNG_SetChunkInfo_set_IHDR,struct%,info%,width,height,depth,colour_type,interlace,PNG_COMPRESSION_TYPE_DEFAULT,PNG_FILTER_TYPE_DEFAULT
:
REM Write the palette information
IF colour_type=PNG_COLOR_TYPE_PALETTE THEN
 PRINT"Writing palette, depth = ";depth
 PRINT"                  cols = ";1<<depth
 SYS "PNG_SetChunkInfo",PNG_SetChunkInfo_set_PLTE,struct%,info%,newpalette%,1<<depth
ENDIF
:
REM Write a text chunk
PRINT"Write a text chunk..."
SYS "PNG_SetChunkInfo",PNG_SetChunkInfo_set_text_one,struct%,info%,"Creator","RISC OS TestCreate sprite->PNG converter",PNG_TEXT_COMPRESSION_NONE
:
REM Write information
PRINT"Write information"
SYS "PNG_Info",PNG_Info_write_info,struct%,info%
:
REM And ensure that we have the correct format
IF (log2bpp = 5) THEN
 PRINT"Removing filler byte from input"
 SYS "PNG_Set",PNG_Set_set_filler,struct%,0,PNG_FILLER_AFTER
ENDIF
IF (log2bpp<3) THEN
 PRINT"Changing packing"
 SYS "PNG_Set",PNG_Set_set_packswap,struct%
ENDIF
:
REM Write some lines
PRINT"Write lines"
FORI=0TOheight-1
 SYS "PNG_Process",PNG_Process_write_row,struct%,screen%
 screen%+=linelen
NEXT
:
REM Finish writing data
PRINT"Finishing"
SYS "PNG_Process",PNG_Process_write_end,struct%,info%
:
REM And destroy at the end
PRINT"Destroy structure"
SYS "PNG_Structure",PNG_Structure_destroy_write_struct_noptr,struct%,info%
:
CLOSE#o%
:
SYS "OS_File",18,"PNG",&b60
:
END
:
:
DEFPROCerror(err,err$,erl)
ON ERROR OFF
PRINT"Error: ";err$;" at line ";erl
REPEAT
 SYS "PNG_Functions",PNG_Functions_get_warning,struct% TO p%
 IF p%<>0 THENSYS "XOS_IntOn",p% TO p$:PRINT"Warning: ";p$
UNTIL p%=0
ERROR EXT err,err$+" at line "+STR$erl
ENDPROC
ImageFileRender
The ImageFileRender module was intended to address a common problem that came up when people wanted to plot things on first starting to use RISC OS. It was a crazy position to be in, really. You started working on writing an application and you wanted to render a sprite, JPEG or DrawFile (or whatever) in your application. You'd already gone through the hoops of getting the redraw region right in your Wimp application and you just wanted to plot something. For the DrawFile, things weren't too bad. For JPEG they were a little fiddly, but doable. For sprite you had to faff around with transformations, and colour translation tables.
For any other image format you had to find its documentation to work out how to do the rendering - !ArtWorks is an easy example to give. You could tell the user to run the files through !ChangeFSI first, if they were alien file formats - or you could invoke it yourself if you were willing to dip into the way that it worked.
I've just listed possibly 5 different ways in which you can get something on the screen for different types of data, each of which has different interfaces and their own particular problems. The operations don't change that much if you want to print the files, but you have to be a little more careful on how you do some of the operations.
To a relatively competent author such as myself this is all doable, but tedious. To a new comer it's really frustrating that you find you have to learn a whole bunch of stuff just to say 'plot this here'. If, as an engineer, you're spending a good proportion of your time apologising for missing, or poor, functionality, there's something wrong that should be addressed.
The ImageFileRender was created for exactly this reason, bringing together the rendering functions built in to the system (DrawFile, JPEG, Sprites) and allowing other file formats to also be rendered.
I wanted someone to be able to write an application which could create greetings cards, where the user could choose their images by just dropping them on to a template window, and the image could be moved around. Maybe rotate it slightly if their baby's face (or whatever) wasn't quite aligned right. Maybe add a border to it (see the Borders section in the earlier Graphics ramble). Then they can print it out and get exactly what they designed.
That wasn't the only use case, but it incorporated the main features I wanted to provide, and would be useful in other places as well. Starting with a realistic use case really helps to provide direction. It should be something that a new comer to the system would be able to just say 'oh, so I call this and I get my image on the screen, great... now I can get on with the logic of my application'.
The interface became a little more complex than I intended initially, because of the extra features I added to support more advanced operations. However, almost all of the values can be passed a '0' parameter to indicate a default should be used. I regret a little the fact that the interface isn't as simple as I had aimed it to be, but the extra features can always be ignored - and hopefully that's obvious to people looking at the API for the first time.
Recently there were comments on Usenet from someone who almost exactly echoed the rationale for the ImageFileRender. Amusingly the lament from someone (I forget who, I'm afraid) was that there wasn't a standard way of doing it. That makes me a little, sad because ImageFileRender was intended to be that standard and to make it easier to do so, and yet people restrict themselves to the old methods. I understand why, but I think it's pretty stupid to be stuck back in the dark ages like that.
Render types
The ImageFileRender interface is able to perform 3 main types of plot - scaled, to fit a bounding box, and transformed. Each of which is processed by the core ImageFileRender module into the single 'plot transformed' call to the renderers. A 'scaled' plot is just a single transformation which scales and sets the offset position. A 'to fit' plot first requests the bounding box of the file being rendered from the renderer, then constructs a transformation which will fit within the box (allowing for the border and any rotation), and finally applies the offset. The 'transformed' plot merely applies the offset that the image is being rendered at.
The renderers only had simple operations, so that the plots could be performed in a useful way. The operations that the rendering handlers had to provide are:
start- begin a render operations, caching any data from the image that might be neededstop- complete a set of render operations, discarding data that might have been cached.render- plot the image transformed and colour mapped as requested.declare- declare any fonts to be used, as required by printer drivers.bbox- return the bounding box for the document.info- return information about the image file.
Initially I hadn't envisaged having the 'start' and
'stop' entry points, and
the interface was intended to be completely stateless. However, when the 'to
fit' render format was introduced I knew it was absolutely necessary, as
there would be two calls on the same image. Most likely the renderer could
cache data between the operations so that it would be more
efficient.
When the renderers were registered they could supply the types of transformation that they supported. For example, JPEG rendering does not support arbitrary rotation, but does support scaling the dimensions independently. A renderer like Euclid was more restrictive in being unable to scale dimensions independently.
In the future I wanted to add a final render type, which would have
completed the set. The 'tiled' render operation could have been handled in
the ImageFileRender module to render the image file repeatedly to fill the
clipping rectangle. The plan had been that on registration the renderer
would set another capability flag to indicate that it supported tiled
rendering directly. If the flag wasn't set, the region would be tiled by the
ImageFileRender module calling the 'render' operation multiple
times until the region was filled.
That might be inefficient for very small images, but it's possible that small images could be cached. I'm a little sad that I never got around to this feature, but really the lack is due to wanting to make sure I had the time to ensure that the tiled plotting could be performed using arbitrary transformations. So you would have been able to tile the image at 45 degrees and the region would be filled with whatever image file you wanted. Getting the region filling right wasn't going to be hard, but would just take a bit of testing to make sure that wasn't inefficient, and didn't cope badly with edge cases.
Input/output specific features
The interface allowed for different features to be applied to the input and output of the conversion. Initially I wanted a way to be able to say 'draw sprite foo' rather than having to specify it by number, but there's obvious parallels in other file formats. For example, if you were rendering an image whose presentation varied based on input, you could specify the parameters in the input.
For Sprites, the internal renderer allowed you to specify the sprite name you wanted to plot. I thought that maybe the same method could be used for selecting library objects from a library file format (such as those used by !DrawPlus or similar), or the particular viewpoint if you were using a 3D format (such as Euclid).
Qualities
The renderers were passed a quality level from 1-15, which allowed them to render from the lowest to highest quality level, depending on what the images were to be used for. It was expected that the higher quality versions would take longer, or more memory, to render. Many renderers would not have any quality settings, but some like the !ArtWorks renderer offered a large number of quality levels.
Sprites offered two levels - undithered, and dithered - whilst JPEGs provided three levels - undithered, dithered and error diffused. As many conversions went through sprite, they would all take on the render qualities used by Sprite by default.
Each renderer could specify the 'default' rendering level that they should use. This default would be the best trade off for general purpose use. The intention had been that there would be a configuration tool which could control these, allowing the selection of a default rendering quality for each image type. The configuration, and the tool, never got implemented, which was a bit of a pity as they would have helped with some of the thumbnailing operations, but it didn't significantly impact the interface.
Sequence numbers
The images rendered by the ImageFileRender module come from the file itself, but some file formats can include multiple images. In particular the Sprite file format allows for multiple sprites within the file. Many file formats, though only support a single image. I wanted to be able to support both cases, in the simplest way possible - essentially so that a tool to view the file, or a thumbnail, wouldn't need to do anything special just to get something out.
To make this simple, I just provided a sequence number within the API. This was intended to be a way to select which of the images to use, with sequence number '0' meaning 'use the default image'. This allowed thumbnailers and the like to show an image, when multiple exist. There are only two formats that were supplied which actually support multiple images - the sprite renderer used the sequence number to select which sprite to use, and the GIF renderer used it to select the frame to use.
In the case of the GIF conversion, the 'frame' was actually only the parts of the image that were updated, depending on the disposition of the image to be drawn. I'm not sure quite how useful that is, but it made some sense as part of the conversion system.
I had a ImageFileRenderEuclid module which I tried to make work with the ImageFileRender stack, where the sequence number would control the camera in use. This would allow models to have different views which could be selected between. The renderer also used the quality to control the type of lighting in use, and whether the image was being rendered flat or not.
Unfortunately, I couldn't get the !Euclid rendering to work properly, so the module never went anywhere. I think it is probably due to my misunderstanding some things about the module. It may have something to do with the fact that !Euclid was quite old and had not been supported in some time.
Example
The ImageFileRender interface was intended to be simple to use. It is quite flexible, though, so there are quite a few parameters to set up in order to render something. That said, following the API description should be very simple for anyone who's spent a little time working with RISC OS.
REM >TestIFR
REM Example ImageFileRender invocation.
:
file$="Frasier/draw"
SYS "OS_File",20,file$ TO obj%,,,,len%,,type%
IF obj%<>1 THENERROR 1,"File not found"
DIM file% len%
SYS "OS_File",255,file$,file%,0
:
REM Location to plot at, and size
x%=256:y%=256
w%=640:h%=480
REM Spacing and angle, in 16.16 degrees
gap%=8:angle%=45<<16
:
REM Render data
DIM rdata% 16
rdata%!0 = w%
rdata%!4 = h%
rdata%!8 = gap%
rdata%!12 = angle%
:
seq%=0:REM Default sequence number
quality%=(2<<6):REM Quality (0-15)
:
GCOL 0,0,0
RECTANGLE x%,y%,w%,h%
:
REM Render type 0 => 'to fit'
SYS "ImageFileRender_Render",0 OR quality%, type%, file%, len%, 0, seq%, x%, y%, rdata%, 0
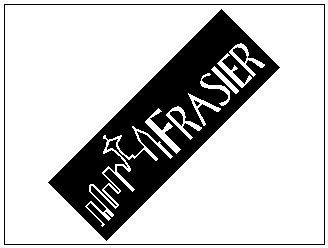
© NBC. Logo drawn by Julian Fletcher.
ConvertPNG
The ConvertPNG module was initially created so that clients could construct sprites from PNGs without having to go through all the PNG calls (which are quite complicated to get right if you want to use the best sprite type for the process). The basic API that the ConvertPNG module used was as simple as I could make it, taking some input from the SWI JPEG_FileInfo call - rather then the density of the image, the SWI ConvertPNG_CreateSprite call returned more details about the colour depth and interlacing. This was useful, but limited in scope - for example, no other graphics format uses Adam7 interlacing, and colour depth doesn't mean the same thing if the format is different (eg CMYK - with the acceptance that PNG doesn't store CMYK data).
As with the JPEG creation calls used by CompressJPEG (and in keeping with the general way that RISC OS calls were designed), the ConvertPNG SWIs took parameters for the buffer size. Users of the API would typically call the SWIs twice - once to find the size required and a second time once that space had been allocated. The initial call for a PNG still meant that some of the data needed to be decoded, but the data required (dimensions, depth, interlace) weren't actually compressed so these were generally fast calls.
The SWI could actually create two different results - a sprite or a sprite area (which is just a sprite with a header). The reason for this was that whilst a 'sprite' is generally what you want, it is common to want to have a sprite area for it to be written into so that it's able to be used by the named SWI calls, and saved to disc. A sprite area just being a sprite file plus a single word header.
REM >CreateSprite
REM A test of the CreatePNG interface
:
REM Load the PNG file
f$="jellyheart/png"
SYS "OS_File",5,f$ TO obj%,,,,inlen%
IF obj%<>1 THENSYS "OS_File",19,f$,obj%
DIM inbuf% inlen%
SYS "OS_File",255,f$,inbuf%,0
:
REM Calculate the size of output
bg%=-1
SYS "ConvertPNG_CreateSprite",0,inbuf%,inlen%,0,0,bg% TO ,,,,outlen%
:
REM Convert the sprite
DIM sprite% outlen%+16
outbuf%=sprite%+16
SYS "ConvertPNG_CreateSprite",0,inbuf%,inlen%,outbuf%,outlen%,bg% TO ,,,,outlen%
:
REM Create the sprite area header, and save
sprite%!&0=outlen%+16
sprite%!&4=1
sprite%!&8=&10
sprite%!&C=outlen%+16
SYS "OS_SpriteOp",&10C,sprite%,"Sprite"
The ImageFileRender module had previously been created for rendering sprites, DrawFiles and others. It was sensible to hook the module up to it so that we could render PNGs through that interface. A few other modules had also been produced at the time which had similar interfaces to handle the information and creation of sprites from them - at least ConvertDoom, ConvertXBM, ConvertGIF were following the same pattern.
The initial ConvertPNG / ImageFileRender implementation was one where the module would create a temporary sprite and plot that. This was a little inefficient, but sufficed to get an image on the screen. One thing that was clear, before I'd gone very far with making the other modules do the same thing, was that they were actually all doing the same thing, and many of the operations that were required to do the rendering were identical. I think I was in the process of support to ConvertGIF when I abandoned it and started out on ImageFileConvert.
Disclaimer: By submitting comments through this form you are implicitly agreeing to allow its reproduction in the diary.